Cody Snider Opened The 2022 Alchitry Cu Path
Cody Snider’s “Getting Started with Alchitry CU” documented the route from unboxing to a binary LED counter on Debian 11 and Linux Mint 20 with open-source tools built from source. The source curriculum dates the work February 27, 2022; the published URL carries February 28.
That work established the technical trail this chapter advances. The main route uses current Alchitry and open-toolchain practice, while a dated appendix preserves the complete 2022 command sequence and its original operating-system context.
Identify The Exact Alchitry Cu Revision
Alchitry’s current site places the original Cu among legacy boards and documents its Lattice iCE40 HX FPGA, 100 MHz oscillator, eight general-purpose LEDs, reset button, and USB-C configuration. The Cu V2 product page specifies an iCE40HX8K-CB132, the same LED count and oscillator frequency, and its own schematic and control-header details.
Record the physical identity that drives the build:
- the product and revision printed on the silkscreen;
- the FPGA device and package in the matching schematic or board definition;
- the oscillator, reset, and LED package pins;
- the active polarity of reset and each LED;
- the exact PCF or Alchitry board definition; and
- the loader and USB path that identifies the board.
Use the PCF derived from that exact revision. It connects every top-level RTL name to a physical package pad and protects the board from accidental pin assignments.
Reach The Board Quickly With Alchitry Labs V2
Alchitry recommends Alchitry Labs V2 for Windows, Linux, and macOS. Its Cu settings expose Cu Toolchain → Yosys (Open Source), and the included Alchitry Loader sends a third-party .bin file to the board.
- Install and record a named stable Alchitry Labs V2 release.
- Connect the board through a known data-capable USB cable and confirm its identity in the loader.
- Create the smallest project for the exact Cu revision.
- Select the Yosys open-source Cu toolchain.
- Build and load a one-LED or divided-counter hardware check.
- Insert the course counter once board detection, pin mapping, build, and loading all operate together.
Alchitry’s starter curriculum centers on Lucid; this course keeps Verilog as the design language. Use the current project flow to establish board and loader operation, and run the Verilog testbench through Icarus or Verilator. The IDE builder, interactive simulator, and language-interoperability path can support different Verilog subsets.
Use Alchitry’s first-party Getting Started, Your First FPGA Project, original Cu page, and Cu V2 page to match the software path to the board.
Expose Every Stage With A Pinned Open Toolchain
A named OSS CAD Suite release packages Yosys, nextpnr, and Project IceStorm into an open flow whose intermediate files remain visible. Yosys installation guidance identifies OSS CAD Suite as the easiest binary route.
Record the release name and these version outputs:
yosys -V
nextpnr-ice40 --version
icepack -h 2>&1 | head
iverilog -V
Those versions identify the parser, device database, packer, and placer that transform the source into the physical configuration.
Convert A 100 MHz Clock Into A Visible LED Sequence
A 100 MHz clock drives counter updates far beyond human vision. Reuse the parameterized counter as a 27-bit divider and expose its slow upper slice on eight LEDs:
module board_top (
    input  wire       clock_100mhz,
    input  wire       reset_n,
    output wire [7:0] led
);
    wire [26:0] divider;

    counter #(.WIDTH(27)) counter_for_humans (
        .clk   (clock_100mhz),
        .reset (~reset_n),
        .count (divider)
    );

    assign led = divider[26:19];
endmodule
Match the wrapper polarity to the board schematic: invert active-low LEDs and remove the reset inversion for an active-high button. Keep those board facts at the wrapper while the reusable counter remains unchanged.
The loaded design produces an eight-bit binary pattern that advances slowly enough to follow by eye. Record a timed sequence together with the exact source, PCF, tool versions, build log, and bitstream hash so another engineer can reproduce the same hardware configuration.
Yosys Maps RTL Toward iCE40 Resources
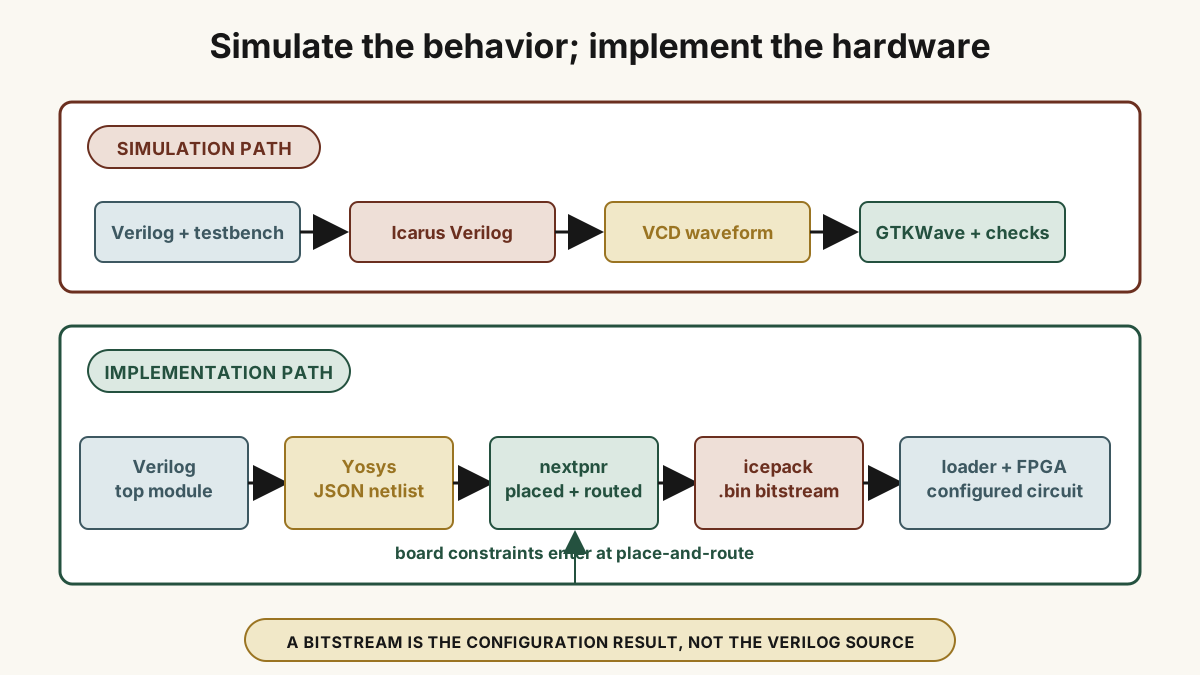
Yosys reads the selected Verilog sources, elaborates their hierarchy, selects board_top, synthesizes the logic, and maps it toward iCE40 cells. This invocation writes the resulting netlist as JSON for nextpnr:
mkdir -p build
yosys -p '
  read_verilog counter.v board_top.v
  synth_ice40 -top board_top -json build/board_top.json
'
JSON carries the design between these two tools; Yosys can emit other formats for other flows. Read the synthesis log for the selected top, inferred registers, resource counts, and warnings about undriven or optimized-away ports. The official synth_ice40 documentation details the device-oriented synthesis step.
nextpnr Places, Routes, And Times The Circuit
nextpnr combines the netlist, device and package selection, and board constraints. It chooses physical cells, assigns legal programmable routes, and calculates the achieved timing against the requested frequency.
For a Cu V2 whose matching documentation specifies iCE40HX8K-CB132, use this command shape:
nextpnr-ice40 \
  --hx8k \
  --package cb132 \
  --json build/board_top.json \
  --pcf path/to/the-matching-cu-v2.pcf \
  --asc build/board_top.asc \
  --freq 100
Point the PCF path at the file for that exact board revision. For the original Cu, select its documented device, package, and pin map. The --freq 100 requirement describes the 100 MHz input domain; keep it aligned with the oscillator that drives the top-level clock.
nextpnr writes the placed-and-routed configuration as an IceStorm ASCII .asc file. The next stage packs it into the loader’s binary format.
IceStorm Packs The Binary Configuration
Project IceStorm supplies iCE40 configuration documentation, chip databases, and packing tools. icepack converts nextpnr’s ASCII configuration into the binary bitstream:
icepack build/board_top.asc build/board_top.bin
sha256sum build/board_top.bin
The full chain separates synthesis, placement and routing, and bitstream packing into distinct transformations. The PCF supplies board pin assignments, while IceStorm supplies the target device’s configuration knowledge.
Follow the official nextpnr iCE40 example flow and Project IceStorm overview for tool-specific details.
Load The Bitstream And Watch The Counter Run
Open the Alchitry Loader included with Alchitry Labs, select the identified board, and load build/board_top.bin. Record the loader version and board identity because interface labels and command-line entry points can change between releases.
Complete the hardware run through five direct observations:
- The loader identifies the selected board over USB.
- The build log names the selected FPGA and package.
- The PCF binds the clock, reset, and each LED to documented pins.
- The counter leaves reset and displays an ordered binary progression.
- A second load with a deliberately changed LED mapping produces the corresponding physical change.
Locate Failures At The Stage That Produces Them
PATH, source commit, PCF hash, build commands, and bitstream hash.The Complete 2022 Build-From-Source Route
Cody Snider’s route solved a real 2022 problem: Debian 11 and Linux Mint 20 users faced scattered Alchitry Cu instructions and often compiled Yosys, IceStorm, and nextpnr themselves. The following dependencies and commands preserve that route in full.
Run this dated, unpinned sequence only in an isolated environment prepared for its host-wide installs. The commands clone moving branches and invoke sudo make install. To reproduce the flow today, select tested commit hashes, name the OS image, and follow the matching upstream build instructions.
2022 dependency set
sudo apt-get install build-essential clang bison flex libreadline-dev \
gawk tcl-dev libffi-dev git mercurial graphviz \
xdot pkg-config python python3 libftdi-dev gperf \
libboost-program-options-dev autoconf libgmp-dev \
cmake python3-dev libboost-all-dev libeigen3-dev
2022 Yosys source build
git clone https://github.com/YosysHQ/yosys.git yosys
cd yosys
make -j$(nproc)
sudo make install
Yosys synthesizes the selected Verilog hierarchy into a netlist for the following iCE40 implementation tools. This route uses JSON as the interchange format.
2022 Project IceStorm source build
git clone https://github.com/YosysHQ/icestorm.git icestorm
cd icestorm
make -j$(nproc)
sudo make install
IceStorm supplies iCE40 device configuration knowledge and tools including icepack. The board’s matching constraints provide its pin assignments.
2022 nextpnr source build
git clone https://github.com/YosysHQ/nextpnr nextpnr
cd nextpnr
cmake -DARCH=ice40 -DCMAKE_INSTALL_PREFIX=/usr/local .
make -j$(nproc)
sudo make install
nextpnr performs placement and routing—the P and R in its name—and transforms the synthesized logical graph into a legal physical iCE40 configuration.
2022 LED-counter build and upload
Cody’s sequence then cloned his Alchitry Cu tutorial repository, built the onboard LED counter, connected the Cu, and uploaded the binary. The counter uses the board’s own LEDs; the I/O expansion board can remain attached without affecting it.
git clone https://github.com/codysnider/alchitry-cu-tutorial.git alchitry_tutorial
cd alchitry_tutorial
make clean && make all
make upload
The source curriculum used git@github.com:codysnider/alchitry-cu-tutorial.git, which requires a configured GitHub SSH key. The HTTPS form above reaches the same 2022 repository without that setup. Match its board files and targets to the original Cu before running the build; Cu V2 uses its own current device and constraints.
Complete The Full Source-To-LED Chain
Run the simulation, read Yosys’s selected top and resource mapping, route against the exact device, package, PCF, and clock requirement, hash the binary from icepack, identify the board in the loader, and watch the expected LED sequence. The result connects every transformation from Verilog source to physical FPGA behavior.